Table of Contents
As an Amazon Associate, we earn from qualifying purchases. This means we may receive a small commission at no extra cost to you when you buy through links on this page.
Introduction: Why Tent Waterproofing Matters (Especially in the UK!)
The UK’s weather is, let’s be honest, notoriously unpredictable. From gentle drizzles to torrential downpours, campers need to be prepared for anything. A waterproof tent isn’t a luxury; it’s essential for a comfortable and enjoyable experience. Even the most expensive tent will see its waterproofing degrade over time due to UV exposure, abrasion, and general wear and tear. A leaky tent can quickly ruin a camping trip, leading to damp gear, sleepless nights, and a miserable time. As we move into 2026, tent materials are continually evolving, with a greater focus on sustainability and performance, but even the newest fabrics require proper maintenance to stay waterproof. This guide will equip you with the knowledge to keep your tent dry, whatever the British weather throws at you.
Understanding Tent Waterproofing: Hydrostatic Head & Fabrics
The level of waterproofing a tent offers is measured in millimeters of ‘hydrostatic head’ (HH). This represents the amount of water pressure the fabric can withstand before water starts to penetrate. A higher HH rating means better waterproofing. For UK camping, a minimum of 3,000mm HH is generally recommended, with 5,000mm or higher for more exposed locations or prolonged wet weather.
Common tent fabrics include:
- Polyester: Cost-effective and UV resistant, but generally requires a waterproof coating. Typically around 1,500-3,000mm HH without coating.
- Nylon: Stronger and lighter than polyester, often used in higher-end tents. Offers better tear resistance but can be susceptible to UV degradation. Typically around 2,000-5,000mm HH without coating.
- Canvas: Traditionally used for bell tents and some family tents. Naturally water repellent but heavy and requires regular treatment.
These fabrics are often treated with coatings to enhance their water resistance:
- PU (Polyurethane) Coatings: Common and affordable. Can crack and delaminate over time, reducing waterproofness.
- Silicone Coatings: More durable and flexible than PU coatings, offering longer-lasting waterproofing. More expensive.
Finally, Durable Water Repellent (DWR) is a coating applied to the exterior of the fabric. It causes water to bead up and roll off, preventing saturation. DWR is *not* the primary waterproofing – it’s a crucial first line of defence, but it wears off and needs to be reapplied.
Step 1: Cleaning Your Tent – Preparation is Key
Before reproofing, your tent needs a thorough clean. Dirt, grime, and old waterproofing residue prevent the new treatment from bonding effectively. Follow these steps:
- Pitch your tent: This makes cleaning much easier.
- Brush off loose dirt: Use a soft brush to remove leaves, mud, and debris.
- Wash with tent cleaner: Use a dedicated tent cleaning product (avoid household detergents!). Nikwax Tent & Gear Wash is a popular choice.
- Rinse thoroughly: Ensure all soap residue is removed.
- Allow to dry completely: This is crucial before applying any waterproofing treatment.
Avoid harsh chemicals, bleach, or abrasive cleaners, as these can damage the fabric and coatings.
Step 2: Inspecting for Damage – Zippers, Seams & Fabric
Cleaning is a good opportunity to inspect your tent for damage. Pay close attention to:
- Tears and holes: Even small punctures can let water in. Repair these with a tent repair kit.
- Zippers: Check for smooth operation. Lubricate with a zipper lubricant if necessary.
- Seams: These are common leak points. Look for peeling seam sealer or loose stitching.
- Fabric: Inspect for worn or faded areas, which indicate a breakdown of the waterproofing.
A thorough inspection now can save you a lot of trouble later.
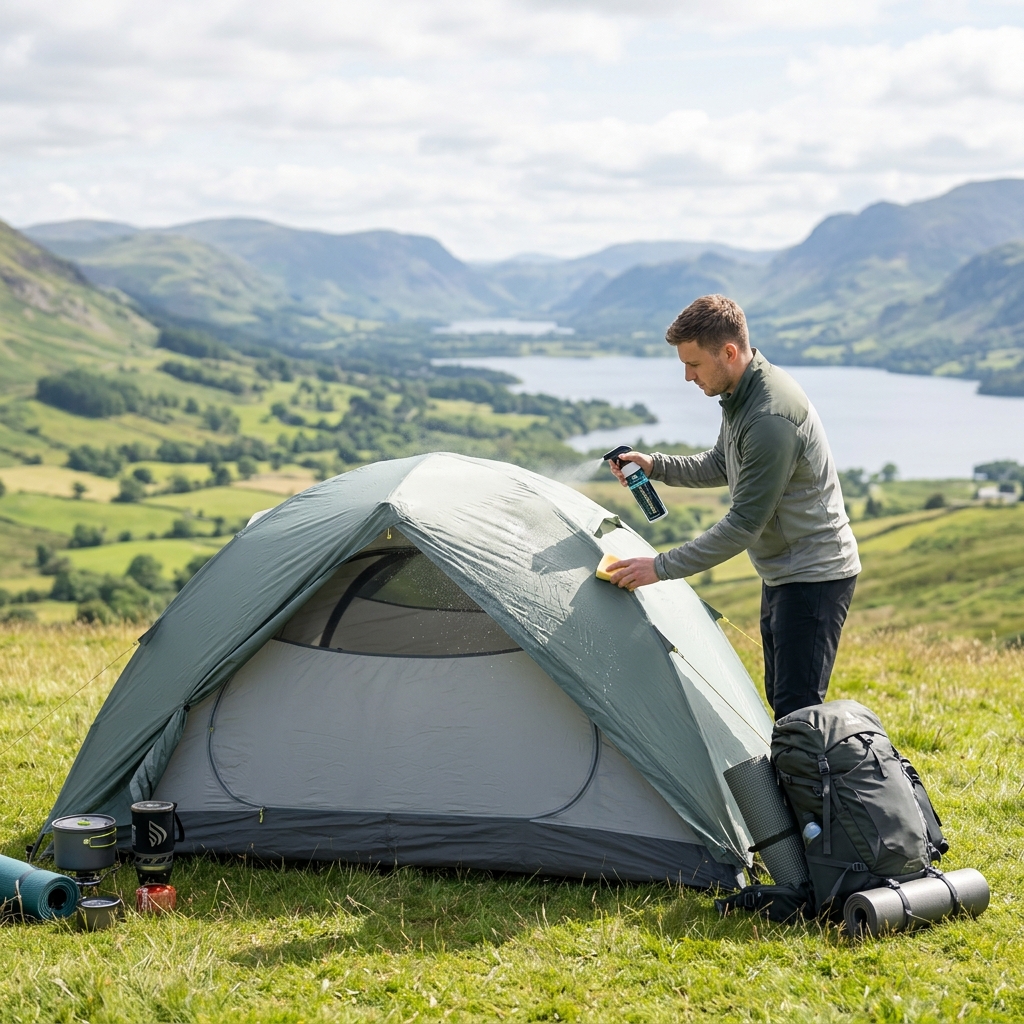
Step 3: Reproofing Your Tent – Spray-On vs. Wash-In
Reproofing restores the DWR coating and enhances the tent’s overall water resistance.
Spray-On Waterproofing
Spray-on treatments are easy to apply and good for targeted areas.
- Pros: Quick application, good for spot treatment, less water needed.
- Cons: Can be less even coverage, potentially messy, requires good ventilation.
Application: Apply evenly to a clean, dry tent. Follow the product instructions for spray distance and coverage. Allow to dry completely in a well-ventilated area (usually 24-48 hours).
Recommended Products: Nikwax Tent & Gear SolarProof Waterproofing Spray (500ml) – £19.99, Grangers Tent Waterproofing (600ml) – £22.50, Vango Waterproofing Spray (300ml) – £12.99
Wash-In Waterproofing
Wash-in treatments are applied during a washing cycle, providing more even coverage.
- Pros: Even coverage, less messy, can clean and reproof simultaneously.
- Cons: Requires a washing machine large enough for the tent, longer drying time.
Application: Add the wash-in treatment to your washing machine along with the tent (ensure the machine is clean!). Use a gentle cycle with cool water. Rinse thoroughly. Allow to dry completely – this can take several days.
Recommended Products: StormSure Waterproofing Treatment for Tents – £29.95, Tentipi CP Waterproofing – £35.00
Step 4: Seam Sealing – The Often-Overlooked Step
Even with a reproofed tent, water can penetrate through the seams. Seam sealing creates a waterproof barrier over the stitched areas.
- Application: Apply seam sealer to both the inside and outside of all seams. Use a small brush or applicator. Allow to dry completely between coats.
Recommended Products: Gear Aid Seam Grip SIL Silicone Waterproofing – £14.99, Aqua Sure Tent Sealant (50ml) – £8.50
Maintaining Waterproofing: Best Practices & Storage
To extend the life of your tent’s waterproofing:
- Regularly clean your tent: After each trip, brush off dirt and debris.
- Reapply DWR as needed: Typically every 1-2 seasons, or when water no longer beads up on the fabric.
- Store your tent properly: Ensure it’s completely dry before storing. Store in a cool, dry place away from direct sunlight.
- Avoid folding the tent in the same way each time: This prevents creases and stress on the fabric.
Troubleshooting: Common Waterproofing Problems & Solutions
- Persistent leaks: Check seams and fabric for damage. Reapply seam sealer and reproof.
- Peeling waterproofing: Clean the area thoroughly and reapply reproofing treatment.
- Zipper malfunctions: Lubricate the zipper with a zipper lubricant.
New Technologies in Tent Waterproofing (2026 Outlook)
By 2026, we’re seeing exciting advancements in tent waterproofing. Manufacturers are increasingly focusing on eco-friendly alternatives to traditional PU and silicone coatings. Bio-based waterproof coatings, derived from renewable resources, are becoming more prevalent. We’re also seeing the development of more durable and long-lasting coatings that require less frequent re-application. Nanotechnology is being explored to create fabrics with enhanced water repellency and breathability. Expect to see tents with improved waterproofing performance and a reduced environmental impact in the coming years. Furthermore, self-healing fabrics are on the horizon – materials that can automatically repair minor tears and punctures, adding another layer of protection against the elements.
FAQ
Q: How often should I waterproof my tent?
Generally, once or twice a year, depending on usage and weather exposure. If water stops beading on the fabric, it’s time to reproof.
Q: Can I waterproof a tent in cold weather?
Yes, but ensure the tent is completely dry before applying any treatment. Some products may have specific temperature recommendations.
Q: What’s the difference between hydrostatic head and waterproof rating?
They are the same thing. Hydrostatic head (HH) is the measurement used to determine a fabric’s waterproof rating.
Q: Is it better to spray or wash-in waterproofing?
It depends on your preference and the size of your tent. Wash-in generally provides more even coverage, while spray-on is quicker and better for spot treatments.
Q: What should I do if my tent still leaks after reproofing and seam sealing?
Inspect the tent again for any hidden damage. Consider professional repair if the damage is extensive.