Table of Contents
As an Amazon Associate, we earn from qualifying purchases. This means we may receive a small commission at no extra cost to you when you buy through links on this page.
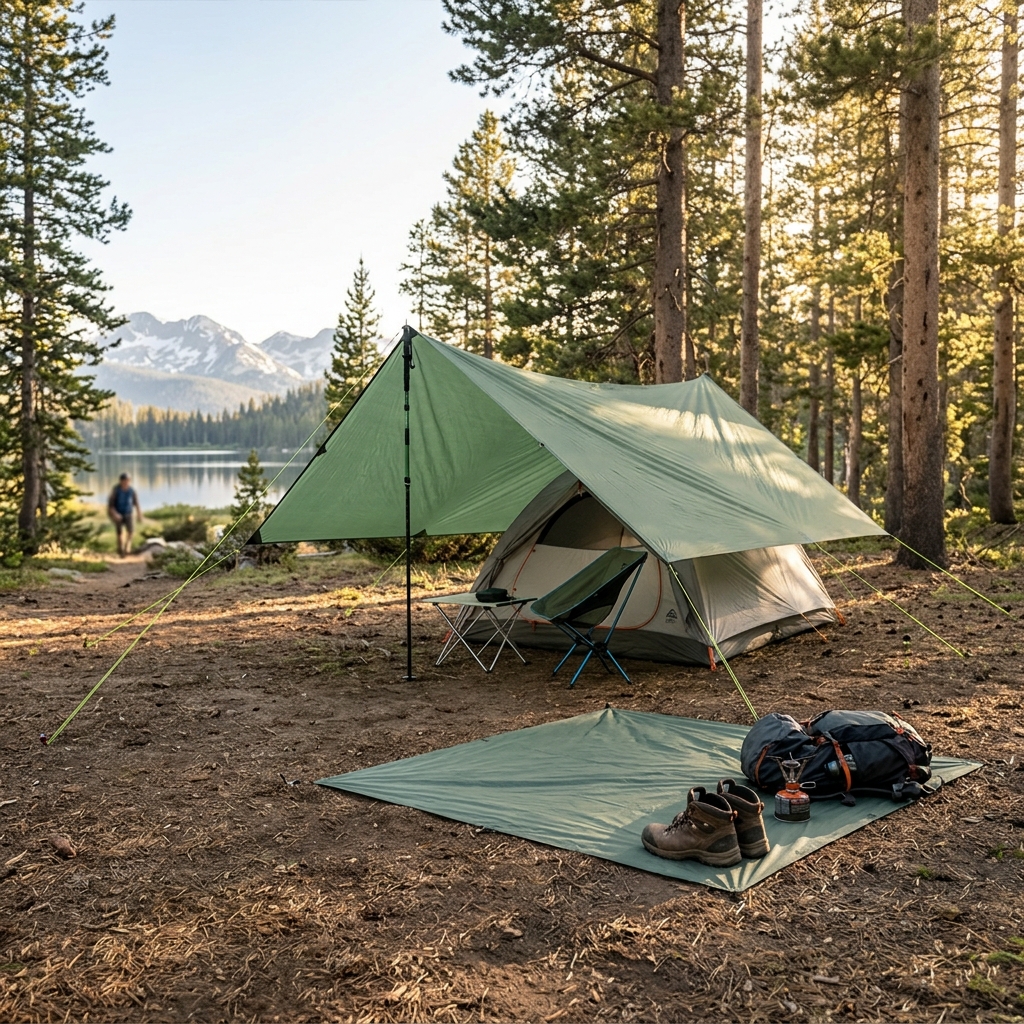
What is a Camping Tarp & Why Do You Need One?
A camping tarp is essentially a large sheet of waterproof or water-resistant material. It’s one of the most versatile pieces of kit a camper can own, offering protection from the elements, a dry space for cooking, and even a ground sheet to safeguard your gear. Forget thinking of it as just a backup – a tarp can be the *core* of your shelter system, or a vital addition to existing camping setups.
Tarps are typically made from one of three main materials:
- Polyethylene (PE): The most affordable option. It’s heavy and not incredibly durable, but it’s excellent for basic groundsheets and temporary shelter.
- Silnylon: A silicone-coated nylon. It’s significantly lighter and stronger than polyethylene, offering a good balance of weight, durability, and cost.
- Cuben Fibre (Dyneema Composite Fabric): The lightest and most durable (and expensive!) option. Ideal for serious backpackers and those needing maximum weather protection with minimal weight.
Even if you always take a tent, a tarp is invaluable for extending its lifespan by acting as a footprint (groundsheet), or as a flysheet for extra protection in heavy rain. Weight and durability are key considerations. A heavier, more durable tarp is great for basecamps, while a lightweight silnylon or cuben fibre tarp is better for backpacking.
Basic Tarp Setups: The Foundation for Versatility
Mastering a few basic tarp setups unlocks its full potential. You’ll need some cordage (paracord is excellent) and a basic understanding of knots. The taut-line hitch is crucial for adjustable tension.
A-Frame
The simplest setup. Tie two corners of the tarp high between trees (or trekking poles). Stake the remaining two corners to the ground, creating a sloping roof. Ideal for quick shelter from rain.
Lean-To
Similar to the A-frame, but with one side fully open. Tie one long side of the tarp high, and stake the other side to the ground. Good for providing shade or a windbreak.
Closed-End
Creates a more enclosed space. Tie all four corners of the tarp to trees or poles, pulling the sides taut. Provides more protection from the elements than a lean-to.
Diamond
Tie all four corners to separate anchor points to form a diamond shape. This offers good wind resistance and decent headroom.
Shelter from the Elements: Tarp as a Primary Shelter
For lightweight adventures, a tarp can *be* your shelter. It’s significantly lighter than a tent, allowing for faster travel. However, it offers less bug protection and may require more skill to set up effectively in challenging weather.
Rain: A tightly pitched A-frame or diamond configuration will shed rain effectively. Ensure good drainage around your campsite to avoid puddling.
Sun: A lean-to provides excellent shade. Consider using lighter coloured tarps to reflect sunlight.
Wind: A low-profile diamond setup, angled into the wind, offers the best wind resistance. Use strong anchor points and plenty of cordage.
Tarp as Tent Fly/Footprint: Enhancing Your Existing Shelter
A tarp dramatically improves your tent’s performance and longevity.
Footprint
Placed *under* your tent, a footprint protects the tent floor from abrasion, punctures, and moisture. This significantly extends the life of your tent.
Flysheet
Placed *over* your tent, a flysheet adds an extra layer of waterproof protection. This is especially useful in prolonged or heavy rain.
Using a tarp as a footprint is almost always recommended. Using it as a flysheet is best for tents with compromised waterproofing or for exceptionally wet conditions.
Gear Protection & Organisation: Beyond Shelter
The versatility of a tarp extends far beyond shelter. Here are a few ideas:
- Firewood Cover: Keep your firewood dry and ready to burn.
- Cooking Area: Create a clean, dry space for preparing meals.
- Backpack Cover: Protect your backpack from rain during a downpour.
- Gear Storage: Use a tarp as a ground sheet for storing gear, keeping it clean and dry.
- Mud Room: Create a dedicated space for removing muddy boots and clothing before entering your tent.
Advanced Tarp Techniques: For the Experienced Camper
For those seeking more complex shelter options:
Plow Shelter
Requires a longer tarp and utilizes the wind to create a very secure and weatherproof shelter. Best suited for windy conditions.
Multi-Tarp Setups
Combining multiple tarps can create larger, more complex shelters, offering increased protection and living space.
Utilize trekking poles for additional support and leverage natural features like trees and rocks to minimize the need for cordage and stakes.
Choosing the Right Tarp: Size, Material & Features
Selecting the right tarp depends on your intended use and budget. Consider these factors:
- Size: A 3x3m tarp is a good all-rounder. Larger tarps offer more coverage but are heavier.
- Material: As discussed earlier, polyethylene, silnylon, and cuben fibre each offer different trade-offs.
- Grommets: Reinforced grommets are essential for preventing tears.
- Colour: Neutral colours like olive green or grey blend into the environment. Bright colours can be useful for signalling in emergencies.
Here’s a comparison of some popular options available in 2026:
| Product | Material | Size | Weight | Price (GBP) | Pros | Cons |
|---|---|---|---|---|---|---|
| DD Hammocks 3x3m Tarp | Polyethylene | 3x3m | 800g | £59.99 | Affordable, durable for the price. | Heavy, not as waterproof as silnylon. |
| Snugpak Response Tarp | Polyethylene | 3x3m | 750g | £79.95 | Good quality PE, reinforced grommets. | Still relatively heavy compared to silnylon. |
| Aqua Quest Defender Tarp | Silnylon | 3x3m | 450g | £89.99 | Lightweight, waterproof, durable. | More expensive than polyethylene. |
| Vango Core Tarp | Polyethylene | 3.5×3.5m | 900g | £39.99 | Very affordable, large coverage. | Heavy, basic quality. |
| Mountain Warehouse Waterproof Tarp | Polyethylene | 2x3m | 600g | £24.99 | Extremely affordable, compact. | Small size, basic features. |
Tarp Care & Maintenance: Ensuring Longevity
Proper care will extend the life of your tarp:
- Cleaning: Rinse with clean water after each use. Avoid harsh detergents.
- Storage: Store dry and away from direct sunlight.
- Repairs: Small tears can be repaired with tenacious tape or a patch kit.
- Mildew: Prevent mildew by ensuring the tarp is completely dry before storing it.
- UV Damage: Prolonged exposure to UV rays can degrade the material. Store in a dark place when not in use.
FAQ
Q: What size tarp do I need for a solo camper?
A 3x3m tarp is generally sufficient for a solo camper, providing enough coverage for a basic A-frame or lean-to shelter.
Q: Is a silnylon tarp worth the extra cost?
If you’re concerned about weight and durability, then yes. The weight savings and increased strength are worth the investment, especially for backpacking.
Q: What knots are essential for tarp setups?
The taut-line hitch is the most important knot for adjusting tension. A bowline and clove hitch are also useful for attaching the tarp to anchor points.
Q: Can I use a tarp in very windy conditions?
Yes, but you’ll need a low-profile setup (like a diamond) angled into the wind, and very secure anchor points. Be prepared to adjust the setup as the wind changes.
Q: How do I prevent my tarp from flapping in the wind?
Ensure the tarp is tautly pitched. Use plenty of guy lines and secure them to strong anchor points. A well-pitched tarp will minimize flapping.